
Are you tired of relying on dispensaries or your neighborhood dealer? Ready to take your journey into your own hands? It’s time to consider the world of home growing. Stoners make the best growers! Why do stoners make good growers? Because they love it so much, that’s why. They are passionate about it, and passion sustains the hobby. Not only does home growing offer a more sustainable and cost-effective way to enjoy your favorite it, it also puts you in control of the entire cultivation process.
Feminized Seed Sprouted
Don’t just smoke it, sow and grow it!
Imagine being able to walk into your garden or dedicated indoor grow space and pluck fresh, homegrown buds from your very own plants. Picture the satisfaction of knowing exactly where your comes from, free from concerns about pesticides or additives. With home growing, you’re the master of your own cultivation destiny. Growing your own at home isn’t just about convenience; it’s about customization. You get to choose the strains that suit your preferences, whether you’re into the relaxing Indicas, the energizing Sativas, or the balanced Hybrids. You control the growing conditions, ensuring the perfect environment for your plants to thrive.
Save Green While Growing Green
Let’s talk savings. When you grow your own, you eliminate the need to continuously empty your wallet at dispensaries. Invest in quality seeds or clones once, set up your grow space, and watch your savings accumulate over time. Plus, you’ll have an ongoing supply of fresh supply without the hassle of running out or relying on others. Lots of naysayers insist that growing is costly and expensive, but don’t believe them. You could start a home grow for very cheap, and start reaping ounces and ounces of fresh home grown flowers from the comfort of your home. Winning? YES!
Grimm Glue flower
Growing at home is a journey of joy
Growing at home is not just a hobby; it’s a journey filled with joy, learning, and discovery. You don’t have to, you get to! Whether you’re a seasoned green thumb or a newbie to cultivation, each harvest is a celebration of your dedication and effort. You’ll find a profound connection with your plants, nurturing them from seedling to harvest. If you’re ready to elevate your growing experience to new height, then it’s time to consider growing your own at home. Join the ranks of home growers who have discovered the unmatched satisfaction of cultivating their own. With the right guidance, resources, and a sprinkle of green love, you can embark on a journey that’s as rewarding as the vibes itself. So, why wait? Dive into the world of home growing today and let your green thumb lead the way to homegrown bliss!
To embark on this journey successfully, it’s crucial to understand how to germinate seeds and nurture them into healthy, thriving plants.
In this beginner’s grow guide below, we’ll walk you through growing at home simply and sensibly, step by step.
Germinating Feminized Seeds:
1. Choosing Quality Feminized Seeds:
Before you begin, ensure you have high-quality feminized seeds from a reputable source. The quality of your seeds plays a vital role in the success of your grow. Consider growing those seeds from breeders and seed makers like Brothers Grimm Seeds, Green Bodhi, and Purple City Genetics. The Brothers Grimm Seeds seed bank only features well known and respected breeders and seed makers who come from true culture. We recommend buying feminized seeds or autoflower seeds to get your cultivation journey started.
2. Pre-soaking Seeds:
Pre-soak your seeds by placing your seeds in a glass of lukewarm water for about 24 -48 hours. This allows the seeds to absorb moisture and soften their outer shells, making germination easier and swifter.
3. Planting Directly in Growing Medium:
Another method is to plant your seeds directly into the growing medium. Fill small pots or seedling trays with a well-draining, sterile potting mix. Make a small hole (about 0.5-1 inch deep) using a pencil or similar tool, and place the soaked seed with the taproot facing down. Gently cover it with soil and water lightly.
4. Maintaining Ideal Conditions:
– Temperature: Keep the germination environment consistently warm, between 70-80°F (21-27°C).
– Humidity: Maintain high humidity levels, ideally around 70-90%, which can be achieved by covering your pots or trays with clear plastic domes or plastic wrap.
– Light: Seeds do not require light to germinate, so you can place them in a dark, warm area.
5. Patience and Observation:
Germination typically occurs within 2-7 days. Keep a close eye on your seeds, and as soon as they sprout and develop their first set of leaves, it’s time to move them to the next stage of growth.

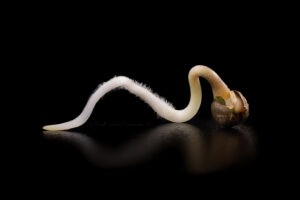
Feminized seeds sprout in water easily
Growing Seeds Indoors:
Now that your seeds have successfully germinated, let’s explore how to nurture them into healthy plants indoors.
Stage 1: Seedling Phase
1. Transplanting:
Once your seedlings have developed their first set of true leaves (usually after about 2 weeks), carefully transplant them into larger pots with a well-balanced potting mix. Be gentle to avoid damaging the delicate roots.
2. Lighting:
Provide your seedlings with 18-24 hours of light per day, using either fluorescent or LED grow lights. Keep the lights close to prevent stretching and ensure even growth.
3. Nutrient Care:
At this stage, seedlings do not require strong nutrients. Use a mild, balanced fertilizer when watering to avoid overfeeding.
4. Maintaining Ideal Conditions:
– Temperature: Maintain a slightly cooler environment, around 70-75°F (21-24°C).
– Humidity: Gradually reduce humidity to around 50-70% as your seedlings grow and develop.
Stage 2: Vegetative Phase (VEG phase)
1. Lighting Transition:
Increase the light intensity and maintain a consistent 18-24 hours of light per day. Transition to high-intensity grow lights for vigorous vegetative growth.
2. Nutrient Management:
Start introducing a balanced, vegetative-stage fertilizer for with higher nitrogen content. Follow the manufacturer’s instructions for the correct dosage. There are many fertilizer brands to consider, so if you’re looking for fertilizer recommendations, try our recommended list of over 25 fertilizers and nutrient brands.
3. Pruning and Training:
Prune or train your plants to encourage a bushy, even canopy. This promotes better light penetration and airflow.
4. Maintaining Ideal Conditions:
– Temperature: Continue to maintain a comfortable temperature range, ideally around 70-85°F (21-29°C).
– Humidity: Keep humidity levels around 40-60%.
Stage 3: Flowering Phase (FLOWER phase / BLOOM phase)
1. Lighting Adjustment:
To trigger the flowering phase, adjust your lighting schedule to 12 hours of light and 12 hours of uninterrupted darkness. This mimics the natural light cycle as the days shorten.
2. Switch to Flowering Nutrients:
Transition to a flowering-stage fertilizer with higher phosphorus and potassium content. This supports bud development.
4. Pest and Disease Prevention:
Continuously monitor your plants for pests and diseases. A clean environment and good airflow can help prevent issues.
5. Harvest Timing:
Harvest your plants when the trichomes (tiny resinous glands on the buds) have turned cloudy or amber, indicating peak strength. The exact timing varies depending on the strain.
Grimm Glue flower
Growing from seed to harvest indoors can be a fulfilling and productive endeavor. By following this step-by-step beginners cultivation guide ( and avoiding the paper towel method), you can ensure a successful and rewarding cultivation experience from the beginning. Remember that patience, observation, and attention to detail are key to achieving optimal results.
Stoners, come cultivate a deeper experience and grow your own at home. Happy growing and don’t forget to stop and smell the flowers.


Anthony Dandreti
March 5, 2024 1:58 amThank you just got my seeds.